In this article
Model Builder holds a number of menus in a bar across the top of the screen and on the various pages in the application. These menus and tools provide access to the functionality.
Models
Click to return to the Models page, in which all the models to which you have access are listed.
Search
This opens the Search page - .

Figure 1 - The Search page
Use this page to search the text content of any text that is in Model Builder. This area is great for testing proposed keywords or topics in your verbatim before you add them to your model expressions. The expression is your entire query that makes up what you are looking for in a category (more on this throughout the document). Adding keywords can sometimes be quite complex, in that you need to test which words and combinations of words achieve the most correct hits. There will be occasions where keywords merely return ‘noise’, but you will need to assess whether or not the hits-to-noise ratio is acceptable. The Search page can help you to decide this for individual words without having the results cluttered by the hits for all the other words in the expression. Once you are happy with what you have tested in the search boxes, you can add the expression into the design area of your model.
Tip!
If you have a large expression, you can expand the search box by dragging the lower right-hand corner.
Click on the green + icon at the side of the expression box to open up other options for testing. You have the choice of adding an AND, OR or AND NOT box. Click on Search to get your results (use Ctrl-Enter as a shortcut to clicking the Search button). - .

Figure 2 - Adding an AND, OR or AND NOT box
Once you have a set of search results, you can choose how they are sorted. This allows you to look at different samples so you can test the accuracy of your results. Choose between ‘Most relevant first’, ‘Least relevant first’, ‘Newest first’, ‘Oldest first’ or Random order - .

Figure 3 - Sorting the search results
You can also flip the 2 search boxes around by clicking on the up and down arrow icons next to the drop-down list. This will only affect the AND NOT functionality, and it gives a good opportunity to test your expressions in the opposite order without having to copy the expressions into the reverse boxes.
You can open the filter options so that you can filter by a particular survey or by time period.
- Click the filter icon beside the Search page title to open the filter - .
- Select one or more surveys to filter your results - . You can also choose the question within the survey if that question has had the Text Analytics folder applied to it.
- Click Apply or Back to select Time Range.
- On completion, click Apply.

Figure 4 - The filter overlay

Figure 5 - Selecting the surveys
Under Time range you can choose from a list of options (last 30 days, last 60 days, last 90 days or last 120 days) or select a custom range - .

Figure 6 - The Time range overlay
Once you have applied the filter you can perform your search and you will only see results from the selected surveys, questions and / or date range.
Your filter for the search page will be remembered during your session. If you navigate to another screen and then back to the Search page, the same filter will be applied. You will see this identified at the top of the screen - . To remove the filter, click on the ‘remove’ icon to the right of the filter.

Figure 7 - The search filter
Keyword Search
The keyword search (available from the search icon on the top navigation bar) can be used to find expressions where you may have used a particular keyword or set of keywords. Click the search icon and type your keyword into the search criteria field. The search will start automatically after a few seconds. The results are presented in the window under the search bar - .

Figure 8 - Using the keyword search functionality
Click on one of the expressions to go into the full expression pane - .

Figure 9 - The expression
Click Go to expression go to the model and the expression in the model.
The Filters
The filter panel on the left of the keyword search helps to refine your search, so that you’re only looking through relevant expressions - .

Figure 10 - The filter panel
The options are:
- Models - you can choose to filter by a single model or by all that are in the account.
- Versions - you can choose between All versions, Active, Design or Other saved versions.
- Type - you can choose between All, Category or Attribute.
- Search content - you can choose between Label & Expression, Label or Expression.
Concept Miner
Concept Miner is Forsta’s AI topic extraction tool. Concept Miner will sort through data and provide the top topics for the given verbatim, and these topics can then be used in your categorization model, helping you to speed up the categorization process (go to Concept Miner for more information).
Company Name
Your company account name is displayed next to the User menu icon. In the event you have administrator access to more than one customer, click the account name to open a list of the customers to which you have access, and select the customer you wish to work with. The list of models associated with that customer and to which you have access then opens.
More Options
The More options icon  , located towards the right end of each model row in the Model List, opens the More Options menu - .
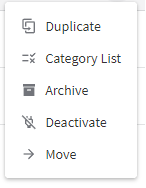
Figure 11 - The More Options menu
The options in this menu are:
- Duplicate - if you need to create a new model that you know will be similar to an existing model, you can create a copy of the existing model and edit the copy, thus saving much time.
- Category list - opens a dialog box that gives you access to the category list (with sub-categories and attributes) and the associated category and attribute IDs (go to The Category List for more information).
- Archive - when you no longer need to use a model and you wish to remove it from the Model List, you can archive it (go to Archiving Models for more information).
- Deactivate - Deactivate the model
- Move - Move the model