In this article
When you open the Models page, each model that you have access to is displayed as one row in the list - . To create a new model, click New model(go to Creating a New Model for more information). To create a new model from an import, click on the drop-down arrow next to New Model then select Import model(go to Importing a Model for more information).
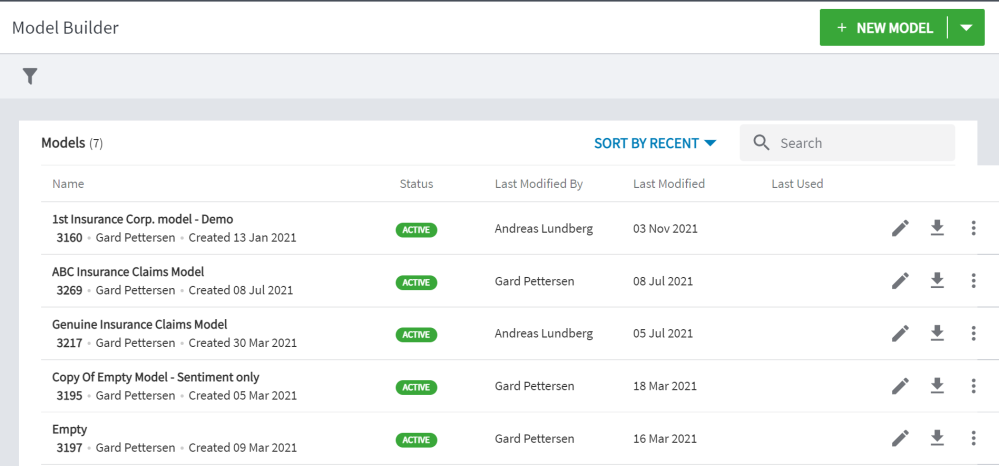
Figure 1 - Example of the Models list
In the event you have many models available, you can use the Search field to find the model you wish to work with. The search looks at both the model names and numbers. You can type a text string into the Search field to filter the model list and display only those models with names that include the entered characters anywhere in the model name. Or you can search by model number. If for example you search for 15, Model Builder will return all models with a 15 anywhere in the name or in the number. Note that the search field is not case-sensitive. To re-display the full list, clear any characters from the field.
You can sort the model list by the most recent accessed, the newest (most recently created), and alphabetically by the model name. The button then indicated the sort selected. Click Sort by... to open the drop-down.
Click on the blue model name link to open the Design page for that model. The details displayed for each model include:
- Name this is the access link to the model. Click on the link to open the Design page for that model.
- Model ID - Beneath the Model name is the Model ID. When the model is created it is automatically given an identification number. This model ID is used when setting up Genius in Forsta Plus.
- Created By - Next to the Model ID is the username of the person who created the model.
- Status – the model is either in ‘Design’ mode or ‘Active’ mode. When it is in Design mode, it has not yet been made Active and cannot be referenced in Forsta Plus. Once the model has been set to Active, it is in Active mode and can therefore be used in Forsta Plus. You must also select which version of the model is to be the Active version (go to Saving the Model for more information).
- Last Modified By - the username of the person who last edited the model.
- Last Modified - the date the model was last modified.
- Last Used - the last time the model was used for analyzing data in Forsta Plus.
-
View/Edit icon -
 has the same effect as clicking the blue Model name link - see above.
 -
Export model icon -
 clicking this opens a dialog where you can save your model to your device.
 -
Three dots icon -
 opens the More Options menu, allowing you to:
Duplicate - Duplicate the model
Category List - Open the list of categories
Archive - Archive the model
Deactivate - Deactivate the model
Move - Move the model
Category List
Open the Category List from the More options menu on the Model List page, or from the Overview page (Get list of categories and attributes). This is a dialog box that lists the latest version of the categories in the model (with sub-categories and attributes) and the associated category and attribute IDs - . If you have not yet released an active version, you will not see the category list. You can copy this list from the dialog box into an Excel® spreadsheet and save it as a tab delimited text file for use in the hierarchy table in Database Designer.
Category and sub-category IDs start with a ‘c’ and attribute IDs start with an ‘a’. Uncategorized comments can also be transferred into the report, and these are given the prefix uc. Uncaptured attributes can be transferred into the report and are given the prefix ua. Note that there are 3 tabs in the Category list pop up. Depending on how your project is set up and how you are reporting on your data, you will need to choose the correct list:

Figure 2 - Example of categories and attributes for a model
- Flat Categories and Attributes - use this category list when you have a hierarchical model and you are going to be using the Text Analytics standard report template for your report. It has the names of the categories, sub-categories and attributes flattened out, with pipe character (|) in between. The report uses the pipe character to parse the information so that you still have the hierarchical structure where needed, but you can also have the full category / sub-category / attribute name in the charts (you need this for the context).
- Categories and Attributes - use this category list if you have a report is not the standard template (i.e. a bespoke report) or if your report was set up before the template was developed. Please note that this is the category list that must be used with the Discovery Analytics Text Analytics widget, if you want to view the true hierarchy.
- Categories - this category list is a legacy option and only to be used if you have an older, flat model.
If you are at all unsure of which list to use, contact your Program Manager or Account Manager for advice.
Note: If you want to use both the Reportal template and the Discovery Analytics widget for reporting, you will need to have both tables in your schema in Database Designer. In the set up in Forsta Plus, the loop-reference must reference the category list with the | (pipe) character. The HierarchyReference variable must reference the category list without the pipe character.
Note also that you are only given the category list for the Active version. This is the version that is in use in Forsta Plus. If you change your active version, you will either need to manually update your Database Designer table in Forsta Plus(see the Genius part of the Authoring documentation to see how this is done) or you can choose to ‘Synchronize model to database designer tables’ (currently on feature toggle), which will sync the table automatically. Don’t forget to also check ‘with full path in label’ if you need the pipe (|) character to be included for your reports..
- Select the full list, then use the Ctrl+C keys on your keyboard to copy the list.
- Paste your list into an Excel spreadsheet.
- Save the Excel spreadsheet in tab delimited text format.
The copy/paste routine will put the content into the appropriate columns, ready for loading into your Database Designer table in Forsta Plus.
This file will be used to reference your hierarchy in Forsta Plus in a Database Designer table. Refer to the Genius part of the Authoring documentation for further information.